Single Regulator Field Replacement Kit Installation Instructions

CAUTION!


Immediately after removing high pressure hose from N2 cylinder outlet, make certain safety plug is put in place in outlet. If valve is accidentally operated, velocity of unrestricted escaping gas is forceful enough to cause injury,
especially about the face and head.
The quick-opening lever may be moved slightly forward, approximately 1/4in. (6.4mm). Forward movement in excess of 1/4in. (6.4mm) may result in actuation of the valve.

150 B Model Wheeled Unit
SingleRegulatorFieldReplacementKitInstallationInstructions150BModelWheeledUnit
  • Remove hose from nitrogen cylinder
  • Remove high and low pressure hoses from regulator
  • Remove regulator and support from clamp by removing cap screw
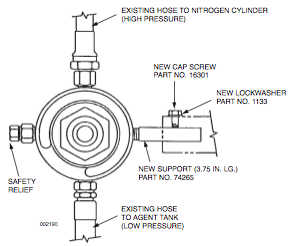
  • Install new support, Part No. 74265, into 1/4in connection on new regulator, opposite of safety relief
  • Install reducing bushing, Part No 19486, into 3/8in, low pressure outlet
  • Remount regulator support into clamp and secure with cap screw and lockwasher
  • Reattach hoses to regulator and nitrogen cylinder

Post-1989 C-Model Wheeled Unit
SingleRegulatorFieldReplacementKitInstallationInstructionsPost-1989C-Model WheeledUnit
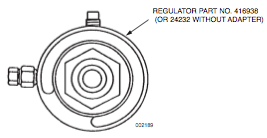
  • Replace existing regulator with Part No. 416938 regulator

Pre-1988 C Model Wheeled Units
SingleRegulatorFieldReplacementKitInstallationInstructionsPre-1988CModelWheeledUnits
  • Remove hose from nitrogen cylinder
  • Remove high and low pressure hoses from regulator
  • Removeregulator and support from clamp by removing cap screw
  • Install new support, Part No. 74265, into opposite of safety relief
  • Remount regulator support into clamp and secure with cap screw and lockwasher
  • Reattach hoses to regulator and nitrogen cylinder